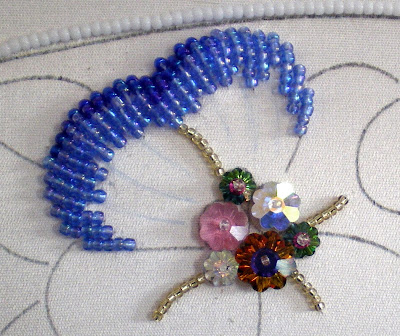
Sunday 29 November 2009

Cord #2

In an earlier post I wrote about the importance of stitching the cords in the correct order. The box chart says to start cord #2 and then begin cord #3. These are done in "imitation wicker" and "single central braided" respectively, the two cords that I learnt on Suehiro. Given how apprehensive I was feeling about this Phase, it was a relief to begin with something familiar.

Cord #2 is done in a 4-1 twist of 417, leaf green. My two favourite colours are green and purple. I love nearly every shade of green except acidy, limey greens and the more olive shades. 417 is an olive green and taken in isolation I found it very unappealing. However, when I began to stitch I saw how beautifully it complimented the gold fabric.

© JEC/Carol-Anne Conway

Cord #3 is also done in a 4-1 twist, this time in 648, a colour that the Japanese Embroidery Centre call burgundy but one I would describe as plum (although, interestingly, when I look at it in artificial light it appears more burgundy). Again, I love nearly all shades of purple but did not find this particular shade very appealling.

© JEC/Carol-Anne Conway

Although, you begin with these two cords, and have to stitch beyond where they pass over cord #1, you have to stop stitching them before they pass back under it.

Happy Stitching

Saturday 28 November 2009

Learning in Phases

Like many things in Japan, Nuido is taught in Phases.

In Phase I the new student learns the most fundamental stitches, those that form the foundation for all other techniques. In Phases II and III, you build on these stitches, learning some padding techniques and special effects. Phases IV-VIII are a little different because they concentrate on specific techniques. In Phase IV, you learn the basic gold work techniques. Phase V concentrates on cords and has a bit of a reputation for being difficult.

I am stitching a design called Himotaba, which is traditionally stitched in Noh Drama colours; red, green, blue, purple and gold. As I know nothing about Noh drama I asked my tutor to choose an appropriate colour palette for me. The colours she selected were really strong and quite unlike anything I would have choosen for myself.

At the start of this Phase I was feeling intimidated by the fabric and the design, and the colour palette left me cold. This was a totally new experience for me; normally I am filled with excitement at the prospect of starting a new Phase.

Thursday 26 November 2009

Another Petal

With the things that I learnt from redoing the first petal, I found it much easier to do the second one.

The padding ends a little abruptly on the right handside but I can live with it.

© JEC/Carol-Anne Conway

Happy Stitching.

Monday 23 November 2009

Reverse Stitching

Thank you for your lovely comments about the first petal. As Sue said, in Japanese Embroidery, removing stitches or beads is called reverse stitching. In Phases I-X we learn 46 techniques (47 if you count reverse stitching), which ever technique you are taught first, reverse stitch is always the second technique you learn (and the one you practice most).

I think it is true that we are our own worst critics. I also think that we know when we have done that we can and when we could do better. I truly thought that I had not done this petal to the best of my ability.

There were four things that I felt could be improved.

The gold beads that mark the central vein on each petal were worked first. When I worked the other beads around them, their postition looked completely at odds with the rest of the petal. I reverse stitched those.

As I said in my previous post, the angle of some of the stitches and the blending of the colours was not pleasing to me. I reverse stitched those.

Although I was quite pleased with the outer row of beads, they did not sit over the padding as comfortably as they could, I thought this might be because the padding beads were a little too close to the edge of the petal. To reposition the padding, I had to reverse stitch the outer row of beads.

In other words, I reverse stitched everything except for the lovely swarovski beads in the center. There was a surprising amount of stitching holding all of these beads in place and it was quite a complex operation to remove it all ovwithout damaging the fabric. It took me er an hour to do.

First, I redid the the padding beads. I think I may have moved them in a little too far, but the outer edge of the petal now rises in a gentler curve than previously. When reworking the remaining beads I paid much more attention to the direction of the stitchs and colour blending. I also used blue thread to stitch the dark and mid blue beads. I wanted to enrich the colour of these beads to give greater contrast with the paler beads, which I stitched with white thread.

© JEC/Carol-Anne Conway

I think that the differences between this petal and the original one are subtle but I am much happier with it. I think it was worth spending time redoing it.

© JEC/Carol-Anne Conway

Happy Stitching.

Sunday 15 November 2009

Poppy Pouch

The poppies on Phase III serve as an introduction to padded beadwork.

The flowers centres are completed first. The technique here is quite simple. One bead is held in place with another bead but these swarovski crystal beads are so stunning, a simple treatment is all that is needed.

© JEC/Carol-Anne Conway

© JEC/Carol-Anne Conway

A single row of beads forms the padding. For the petals the beads are placed about a beads width from the outer edge.

© JEC/Carol-Anne Conway

The beads are worked in long and short stitch, with the first row covering the row of padding.

© JEC/Carol-Anne Conway

The remainder of the petal is filled with short rows of beads. Four different colours are used with the deepest shade of blue on the outside, followed by mid blue and pale blue, then clear beads nearest the centre.

© JEC/Carol-Anne Conway

I have always found long and short stitch difficult, especially worked in an irregular shape. I found it even more difficult to do with beads. I am really not happy with the angles of some of the stitches. Nor am I happy with the colour transitions.

These beads are coming out!

Happy Stitching.

Tuesday 3 November 2009

Japanese Bead Embroidery, Phase III

A few weeks ago at a Japanese Beading class I began Phase III, Poppy Pouch. The design comes in two colour ways, white with blue poppies or black with red poppies. I am making the white version because I like that one best and also to have a change from the black beads of Calm Flow.

Much of the bag is covered with rows of couched beads. With all the hours I spent couching beads on Calm Flow I thought that I had learnt this. On Calm Flow the rows of beads drift together or apart in gentle waves and any remaining spaces are filled with random beading. Once the guidelines are stitched over there is no way of telling if the lines are positioned 'correctly' or not, as long as the curves are smooth and the rows touching. On Poppy Pouch all the couched beads are in parallel lines.

© JEC/Carol-Anne Conway

I thought that this would be straightforward but I soon realised that couching perfectly straight rows is more difficult than it appears. Any wiggle shows up like a sore thumb and is amplified by subsequent rows. The same thing applies if the rows are not absolutely parallel. I found with Calm Flow that if was unhappy with the curve of one row I could adjust the next row to correct it. With the parallel lines, correcting the next row only accentuates the problem.

The poppies themselves introduce some new techniques, such as padding; I thought they were the lesson for Phase III. I now realise that I still had more to learn about couching.

© JEC/Carol-Anne Conway

With both Japanese Embroidery and Japanese Bead Embroidery the Phases are carefully structured. At Phase I you learn the fundamental techniques. In Phase II builds on those techniques and introduces some new ones, as so on with each subsequent Phase. With most things I have done in life I have always wanted to jump straight in at the deep end; run before learning to crawl. With JE and JEB I have been content to learn each stage before moving onto the next. On many of the Phase designs, the technique being taught is repeated over and over. It can seem monotonous at times but this repetition affords ample opportunity to practice and improve before moving on to the next challenge.

© JEC/Carol-Anne Conway

I have another lesson on Saturday; I think I might be ready to move onto padding.

Happy Stitching