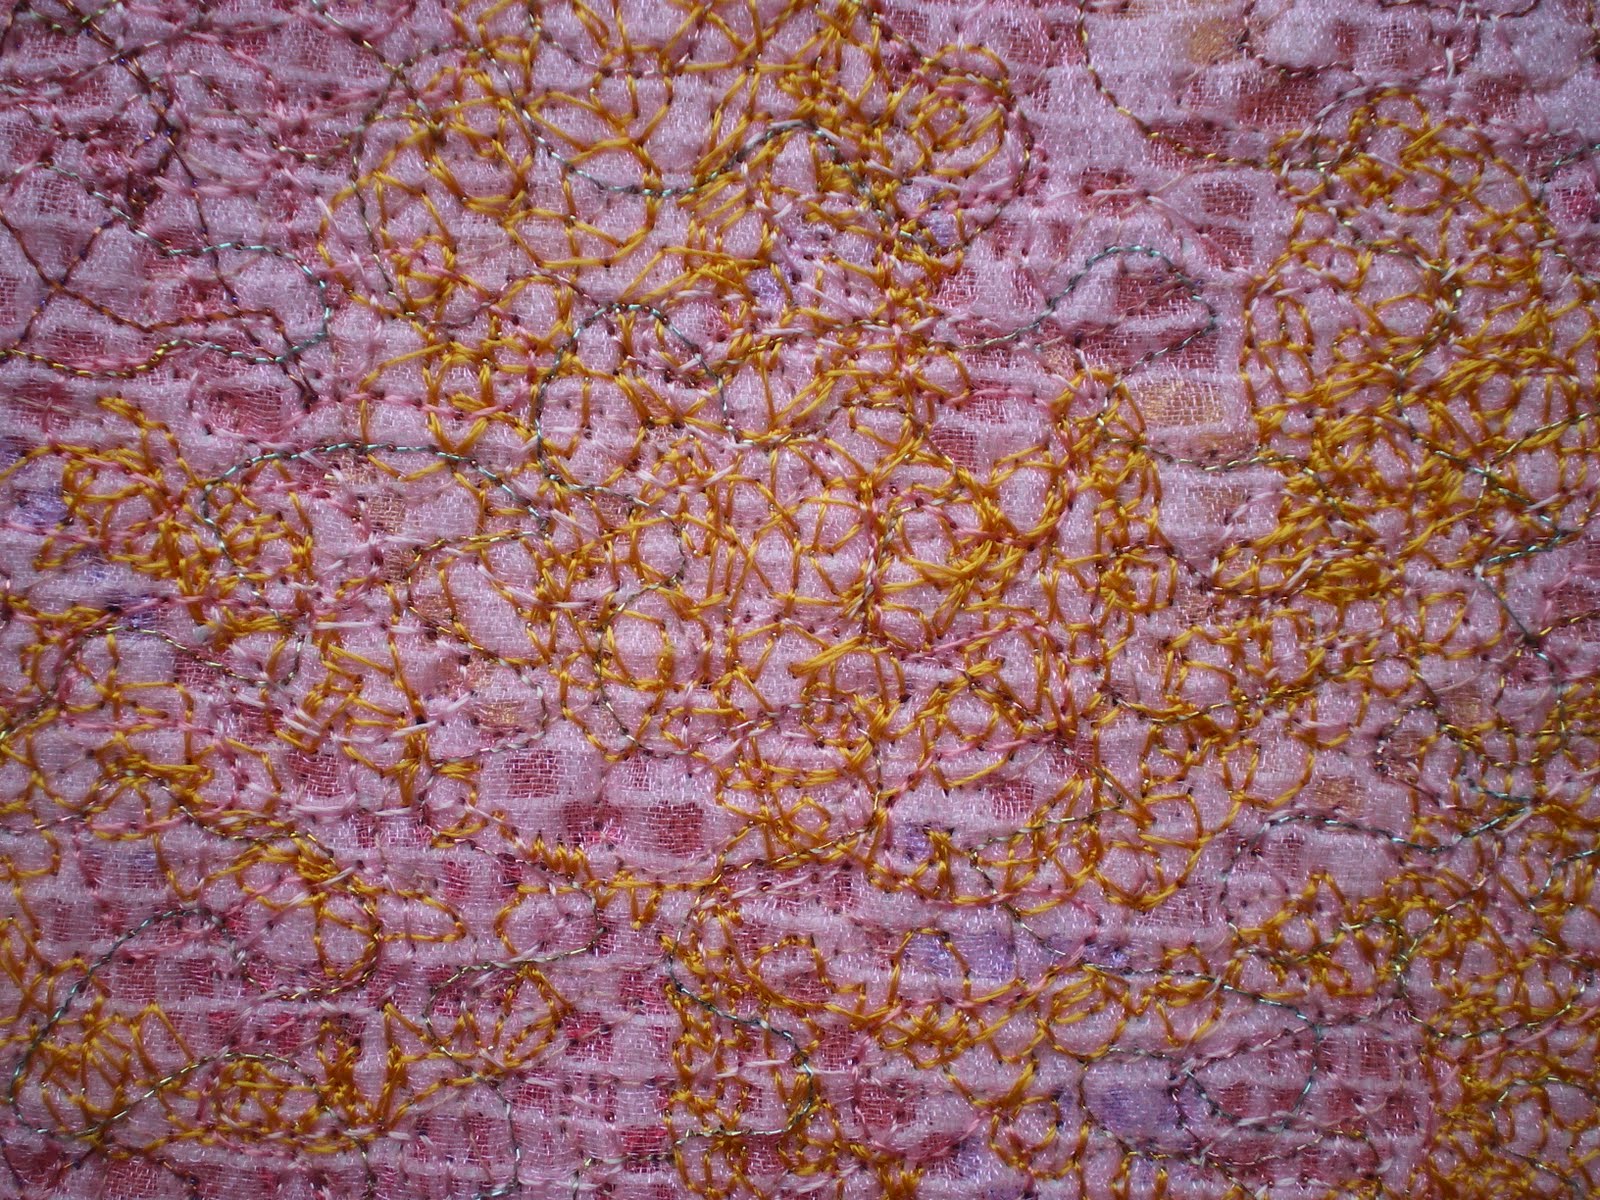
Wednesday 30 March 2011

Camellias, flower 2

When I had completed the petals of the first flower at the end of day two, one of my tutors asked if I wanted to move onto midare-sashinui next. I definitely was not!

Instead I opted to do the left hand flower. It is worked midare-sashinui, the same as the first flower, but this one is padded and worked in flat silk. The advantage of working in flat silk is that the silk spreads slightly and fills the space between stitches. The disadvantage of working in flat silk is that the silk spreads slightly and fills the space between stitches! That is the paradox of working with flat silk.

Each of the petals is padded on the outer edge. The laid stitches of padding cotton are quite long so they are held in place with a couching thread stitched in a lattice pattern.

© JEC/Carol-Anne Conway

The first petal went in surprisingly well but it took me all day to do all of the padding and stitch one petal!

© JEC/Carol-Anne Conway

Since returning home I have had very little time for serious embroidery (I am very busy at work and that is taking most of my time and energy) but I have managed to stitch two more petals.

© JEC/Carol-Anne Conway

I don’t like the way that the second petal looks but I learnt so much in stitching it that it was worth continuing with even when I knew that it was going wrong. I left it in for reference while I stitched the next petal.

© JEC/Carol-Anne Conway

This one I am pleased with, so now I will reverse stitch the bad one and try again.

Happy Stitching

Thursday 24 March 2011

Camellias, flower 1

There are three methods for realistic stitching (long and short stitch) in Japanese embroidery: alternating LSS (nagamijika-sashinui), random LSS (midare-sashinui) and curved angular stitches (kussetsu-sashinui).

The first flower is worked in alternating long and short stitch in twisted silk.

Long and short stitch is something of a misnomer, only the first row is worked in long and short stitches. It seems to me that the first row is crucial; if that one is not right then none of the following rows will be. I really concentrated making the long and short stitches consistent lengths, spacing them evenly and following the contours of the petal.

© JEC/Carol-Anne Conway

In subsequent rows the stitches are all roughly the same length as the original long stitches and only every other stitched is worked filling the space between the 'long' stitches.

© JEC/Carol-Anne Conway

Each petal is worked in three shades. The first row, on the outer edge of the petal, is worked in the darkest shade, followed by the next darkest with the palest shade at the inner edge. The thickness of the thread also gradually decreases from the outside to the inside of each petal.

© JEC/Carol-Anne Conway

I don’t think that I have ever concentrated so hard on a piece of embroidery. To my delight and surprise I completed the first petal without too much angst.

© JEC/Carol-Anne Conway

I was feeling a little less anxious about LSS but did not want to move onto the other methods until I was comfortable with this one so I spent the rest of day one and the whole of day two completing the petals on the first flower.

© JEC/Carol-Anne Conway

I must say that I really surprised myself with this flower. I like how it came out. So far, so good.

Happy Stitching

Tuesday 22 March 2011

Phase VII - Camellias

I spent the second week of March in Bournemouth at a Japanese embroidery class. This is my seventh successive year attending this class. Each year I begin a new Phase; this year was Phase VII -the dreaded long and short stitch. There are two Phase VII designs available, Pansies and Camellias. Both are delightful. I am stitching Camellias.

Back in September Michiko wore a stunning kimono to the Stitch and Creative Crafts show. Although the flowers on it are peonies, I thought that the colour scheme would easily transfer to Camellias. Michiko very kindly brought the kimono to Preston in October so that I could colour match some silks to it and my tutor ordered the design on the fabric that most closely matched the background.


Because of shipping delays, I did not see the fabric until the first day of class. When I picked out the silks that I had intended to use they did not go well with the fabric. We made another selection in similar shades but those didn’t work either. Margaret then made a selection of apricot shades that I really like.


I spent the entire morning framing up, selecting silks, reading instructions - basically doing anything but stitching. Just when I thought that I had run out excuses, I read on my box chart that the first flower in worked in twisted silk. Aha, I had not twisted my silk, another reason not to get started!

Happy Stitching

Wednesday 16 March 2011

New Beginnings

The first week of March did not go exactly as I had planned. My beloved little car suddenly and unexpectedly blew a gasket. Only 2 days earlier she had passed the MOT and the day before I had paid for a year’s tax. I thought that we would be together for at least another year but the cost of repair was non-viable so reluctantly I have had to let her go.

We are a 4 car family and I am not entirely comfortable with that. I have wondered if I could do without my car. The problem is we all work full time, but at disparate locations and we live in a village with no public transport. Just one week without my car has shown me how much I rely upon it and I am definitely not ready to give it up. The weekend before I went to Bournemouth was spent frantically searching the county’s car dealers for a replacement vehicle. The search was proving fruitless and we were on the verge of giving up but at our last port of call we found a cute little Corsa. It was sad to wave good bye to my old companion but it was going to happen one day. I’m just getting to know my new car and am looking forward to the adventures we will have together.

In addition, our cat severely beat up (by another cat not by me) and I had to take her to the vet a couple of times. She has made a full recovery now but needed a little TLC for a few days. Things that I had hoped to do before Bournemouth fell by the wayside. I didn’t have a lot of stitching time but I need to do some just to stay sane. When we do the stitching shows, we take a selection of our work. Sometime ago Denise brought with her a small design called ‘Geisha in the Snow’. It totally captivated me and was the perfect design for my frame cover. Denise very generously shared her design but I had not got around to stitching it, until now.


I traced the design onto tissue paper and stitched straight through the paper into the fabric. The Geisha, her umbrella and the bamboo are all worked in stem stitch. The snow is worked in seed stitch. The whole project took just two evenings to complete.


Unusually, I have come to a point where I am beginning lots of new things. Loving Couple was finished a while ago and I have been ready and waiting to start Phase VII of my Japanese embroidery. Poppy Pouch has been nearing completion and would have been done if events had not taken their own course. Phase IV Japanese bead embroidery is waiting in the wings. I have a small project screaming for my attention and I have also enrolled in another on-line course that starts on 1st April.

Everything feels very new and exciting at the moment.

Happy Stitching

Sunday 6 March 2011

... and a Couple More

The Travelling Books for the Oxford Branch of the Embroiderer’s Guild are now into their third season. This time around my pages are following a theme based on the inchies I made just before Christmas (the first TB in my group actually got some of the inchies). I am exploring altering fabrics and each one began life as a piece of white cotton that I dyed with Brusho.


My second piece very much followed the same process as the inchies, first bonding torn fragments of coloured silver foil to the base fabric. I covered this with a piece of lace curtain and then free machine embroidered all over the surface with a variety of threads. I then did more FME in certain areas to pick out some of the lace pattern.


I am not a pleased with this page as the inchies; it is too pink for my taste and not as textured as the first piece.


The third piece I treated differently. First I applied gold paint paste through a stencil. The stencil is a katagami which is a hand cut paper stencil used for dyeing kimono. I have a couple of 'retired' stencils that are no longer in good enough condition for use on kimono. I was hesitant to use them, not really knowing much about them or how to care for them properly. But I have decided that i would rather use them a few times that let them languish in a draw, never to be used again. The design on them is very intricate and gives a very delicate gold pattern on the fabric.


I did not want to totally obscure the pattern so I did not overlaid it with any other materials this time; instead I have over stitched with a variety of threads using some of the decorative stitches on my machine. To stabilize the fabric during stitching I tacked it onto a piece of creative plastic; that allowed me to stitch right to the edges. I don’t think that the design is very coherent but I think the method has some potential and is worth exploring further.


Happy Stitching

Saturday 5 March 2011

... or Two ...

This is another stop/start travelling page made for the swap on the Embroiderer’s Guild forum.


I began this one at a Flower Pounding workshop with Linda Rudkin.


The component parts were made at the workshop but it waited some time to be assembled into a finished design.


Although I had attached the individual flowers with beads, I felt that it was lacking embroidery so added the word Hydrangea in stem stitch.


I think that this is one of the prettiest Travelling Pages I have made thus far.


Happy Stitching

A Travelling Page ...

I started this travelling page several weeks ago but it was a very stop/start project.

I had space-dyed several pieces of cotton with Brusho and from those I selected a piece that I thought had an Autumnal feel to it. The design, by Sam Bourne, was published in Issue 8 of Stitch Magazine in January/February 2001. I have been exchanging Travelling Pages with friends on the Embroiderer’s Guild forum; this design must have stayed in my mind because when I came to do a page for a member who loves trees and oak trees in particular, I remembered it.


I found the instructions very easy to follow.


I enjoyed making the component parts ...


... and assembling them into the finished design.


Happy Stitching

A Necklace

Whenever I visit Amsterdam, I try to visit Coppenhagen Kralen, the bead shop. During my last visit I picked out some beads to make a necklace to wear with a new top.


This necklace was very simple to make, it’s just a matter of stringing the component parts in the right order and attaching the fastener.


Simples!

Happy Stitching

A Cloche Hat

I took it into my head that I wanted a crochet cloche hat. I learnt to crochet at a young age and for some time it was my craft of choice but I mostly crocheted squares for cushion covers or lap blankets. It has been since I did any crochet and my memory which stitch was a little vague so I looked them up on the internet. However, how to hold the hook, loop the thread and pull through all came flooding back to me as soon as I picked up the hook. It is as if the hands have their own memory and when you practice a movement or action over and over, they never forget it.

The pattern I choose was quite simple and I was able to finish the hat in a couple of evenings.


Happy Stitching

A Stitching weekend

For the past few years, I have demonstrated Japanese Embroidery at the Stitch and Creative Crafts show in Manchester. The shows are hard work but good fun and it is always nice to get together with my JE friends. Denise and Jane did not exhibit this year but Denise invited Jane, Sue and me to stay with her so that we did not miss out on a stitching weekend. Unfortunately, Jane was not able to join us.

Since Bridge Between East and West normally gets an outing at the show, I took that with me to stitch. The flowers at the centre of the design are nearly complete; only a few stems and details remain to be done. I decided to make a start on the rows of balls on either side. The balls are all padded but the amount of padding gradually decreases from the largest balls to the smallest. Likewise, although they are all stitched with twisted silk, the number of strands in the twist gradually deceases and the direction of the stitches gradually changes. In order to keep the padding, thread weight and direction of the stitches consistent, I stitched 3 or 4 balls on one side then rotated the frame and stitched the same balls on the opposite side. The balls are very small and did not take long to stitch so I was rotating the frame frequently. It made the stitching rather fragmented but I think it was worthwhile as the finished stitching is nicely consistent.

© JEC/Carol-Anne Conway

We probably spent more time chatting and eating than stitching but had a lovely weekend and are already planning to do it again later in the year.

Happy Stitching

My Stitching Nemesis

As long as I have been interested in embroidery the two stitches I have admired most are satin stitch and long and short stitch. These are also the two stitches that I have found most challenging. In Japanese embroidery there are 5 foundation stitches, horizontal, vertical, weft, diagonal and separated. The first four are essentially the same thing stitched in different directions and they are all essentially satin stitch. When you learn Japanese embroidery these stitches are among the first that you learn and they crop up again and again. Since l have been taking lessons in Japanese embroidery I think that my satin stitch has improved no end.

Long and Short stitch also features prominently in Japanese embroidery but the student does not encounter this technique until Phase VII. The two designs taught at this phase are among the most beautiful of all the phase pieces and although I have admired them greatly, I have never thought about them in terms of my stitching journey. I think because they are done in long and short stitch I pushed them to the back of my mind. When I finished stitching Loving Couple it dawned on me that in my next class I would be starting Phase VII, i would have to tackle the dreaded LSS.

I choose my design and fabric, my tutor placed the order and we waited for it to arrive ... and we waited ... and we waited. I was beginning to think that it would not arrive on time and started to consider other pieces to stitch in class. I almost felt relieved that I would not be doing Phase VII after all. Then last Monday, I heard from my tutor that the order had arrived and my piece was with her. I was surprised by how relieved I felt. I’ve been looking forward to my week in Bournemouth for weeks but for the first time I am actually looking forward to Phase VII albeit with more than a little trepidation.

Happy Stitching

Thursday 3 March 2011

Lacing

I finished Loving Couple several weeks ago and kept telling myself that I had plenty of time to finish and mount it but somehow I put it off and put it off until there were only a couple of weeks left before my next Japanese embroidery class.

I did the finishing two weekends ago (I described the finishing process here when I finished Karahana) and last weekend I mounted it ready for framing. When I had finished Suehiro I took it off the frame but did not mount it immediately. I noticed that some of the stitching, particularly the metallic threads, distorted so now I leave my embroidery on the frame until I am ready to mount it.

The process to remove the embroidery from the frame is the exact opposite of the process of framing up.

© JEC/Carol-Anne Conway

Remove the protective tissue paper. Untie and remove the chopsticks. Remove the lacing stitches.

© JEC/Carol-Anne Conway

Remove the nails and unwind the horizontal bars and remove the embroidery.

© JEC/Carol-Anne Conway

Next I remove the end fabrics. Very often leave about an inch of end fabric to give myself plenty of fabric for lacing; on this occasion that was not necessary.

© JEC/Carol-Anne Conway

With the design trimmed I moved it to a prepared work area. I place a big fluffy towel on the table and cover that with tissue paper, shiny (smooth) side up. I place my embroidery face down on the tissue paper.

© JEC/Carol-Anne Conway

The mount board I am using is 3mm archival foam board; my framer cut it to size for me. I use a layer of silk wadding between the foam board and the fabric. In the past I have found it difficult to keep the wadding in place while positioning it and the foam board on the fabric. This time I attached the wadding to the board with 505 spray which made things much easier.

This picture shows the silk wadding attached to the board but the board is the wrong way up. The board should be wadding side down on the fabric

I work out how to position the design on the board while the fabric is still on the frame and stitch a guideline using couching thread. This only serves as a guide and I measure carefully to make sure the board is in the correct position and aligned with the weft.


Then I begin pinning. Starting at the centre of either the top or bottom edge, I insert a single pin through the fabric and into the foam between the two layers of card. I insert the second pin at the center point on the opposite edge pulling the fabric taught as I do. I then work out towards each edge pinning first one side then the other tensioning the fabric. I place the pins at half inch intervals, if find this helpful when it comes to lacing.

© JEC/Carol-Anne Conway

When the top and bottom are pinned I turn the work over and recheck the position and make sure the design is straight before pinning the two sides in the same way. When the sides are pinned I turn the work face up and check once more that the work is straight and correctly positioned – you cannot check often enough!

© JEC/Carol-Anne Conway

For the lacing I used Gütermann top stitch thread and a Japanese handmade needle to do the lacing. To calculate how much thread I need, I pseudo lace by catching the thread around the pins, then add some for luck. For some reason, I thought that I needed to pseudo lace back in the opposite direction but this gave me twice as much thread as I needed and the surplus thread was a nuisance!


Starting at the center pin, I make a stitch roughly ¼ inch long and pull half of the thread through (the other half will be used later). I then make a ¼ inch stitch on the opposite edge starting in line with the end of the first stitch so the thread is perpendicular to the edge of the board. I continue to stitch first one side then the other at ¼ inch intervals keeping the stitches close to the edge of the board. At this stage there is no need to pull the stitches tight but the thread does have a tendency to tangle if you try to pull it through too quickly. In fact, it has a tendency to tangle whatever you do but I find that pulling slowly and steadily with one hand while maintaining a slight tension on the thread with the other hand helps.


When I get close to the corner I fold the fabric under to make a mitred corner. If necessary I use my tekobari to push the folds into place and smooth out any wrinkles or bulges. When I have stitched all the way to the edge, I temporarily secure the thread by winding it around the pins. Returning to the centre, I thread the other half of the thread and lace towards the other edge. I forgot to mention that before I do the lacing, I attach a label saying what the design is, whon stitched it and when. Later I put the same label on the back of the frame.


When all of the stitches are in place, I tighten them. Starting at one edge I pull the first stitch tight. I keep the tension on that stitch with one hand while I pull the next stitch taught and so on until I have tensioned every stitch and wind the thread around the pins to secure it. I then repeat the process and tension every stitch for a second time. To permanently secure the thread, I make two close parallel stitches through the fabric then make 2 or 3 half hitch knots around the stitches. I then make 2 stitches on the opposite edge and do 2 or 3 half hitch knots around the stitches. I make one more stitch an inch or two away from the knots before I cut of the surplus thread.

The remaining 2 sides are laced in exactly the same way and finally the holding pins are removed. Job done!


© JEC/Carol-Anne Conway

Susan of Plays with Needles wrote a very good blog about lacing.

Happy Stitching

Tuesday 1 March 2011

Progress Report - March

Around the beginning of each month I plan to review what has been done in the previous month and set new goals for the coming month.

Frame 1: I have done the finishing and laced Loving Couple onto mount board ready for framing. I will take LC, unframed, to Bournemouth for my tutor to assess before having it framed. I would have liked to frame up my next Phase piece ready for class but there was a delay in delivery so I will collect the fabric and frame up on the first day.

© JEC/Carol-Anne Conway

Frame 2: I took Embroidery Bridge Between East and West away for a stitching weekend and made reasonable progress. I really like how this piece is developing and hope to give it some more stitching time soon.

© JEC/Carol-Anne Conway

Frame 3: Most of my stitching time has been dedicated to Poppy Pouch and it is coming along steadily. I did not quite meet my target of finishing by the end of February but it is nearly there. I estimate it will take 3-4 hours more stitching to complete this and I hope to do that this week.

© JEC/Carol-Anne Conway

I did not do any work on Frame 4 but nor did I expect to. I want to move Floral Melody onto Frame 3 before I do any more to it.

I also completed 4 travelling pages (I will blog about these when I know they have been delivered), 2 Round Robin Doodle Pages (to be blogged when the Round Robin is completed), crocheted a hat and made a necklace.

In March I go to Bournemouth for a 5 day Japanese Embroidery class (woohoo!), that will set the tone for my stitching for the coming month. I usually find that when I return from Bournemouth I only want to work on the Phase piece that I began in class, but I don’t want Poppy Pouch to fall by the way side. Hopefully, I can finish that in the next few days.

Happy Stitching